Water Hammer Arrestor Installation Locations for Residential Plumbing Systems With Repeated Pipe Noise
A loud bang inside the wall every time the washing machine fills, or a sharp thud when the dishwasher valve snaps shut, is more than an annoyance. It is a pressure spike racing through the pipes, and over time it loosens joints, strains appliance valves, and can eventually open a leak at the weakest fitting. A water hammer arrestor absorbs that spike, but only when it sits in the right place.
This guide maps out exactly where arrestors belong: at the washing machine, dishwasher, ice maker, toilets, and fast-closing faucets, plus how to handle long branch lines, how to size the device, which pipe noises an arrestor cannot fix, and when the problem calls for a plumber.
The Direct Answer: Place the Arrestor Within Six Feet of the Valve That Slams Shut
Install the arrestor as close as possible to the quick-closing valve that creates the shock, and no more than about six feet away. The spike is born at that valve, and every foot of pipe between the valve and the arrestor is a foot of pipe the spike travels through unabsorbed. A washing machine needs one arrestor on the hot supply and one on the cold, right at the outlet box. A dishwasher needs one on its hot supply near the fill valve, usually under the sink. Where one arrestor serves several fixtures on a branch line, it goes near the end of that branch, between the last two fixtures served, and branches longer than about 20 feet need a second arrestor.
How a Sealed Piston Turns a Pressure Spike Into a Whisper
Water hammer happens because water is heavy and nearly incompressible. When a solenoid valve in a washing machine or dishwasher closes in a fraction of a second, the moving column of water behind it has nowhere to go, so its energy becomes a sudden pressure surge that bounces along the pipe. That is the bang you hear.
A mechanical arrestor gives that energy somewhere harmless to go. Inside a sealed chamber, a piston separates the water from a pocket of pressurized air or gas. When the surge arrives, water pressure pushes the piston inward, compressing the gas and absorbing the shock like a hydraulic cushion. Older homes often rely instead on a capped vertical pipe length called an air chamber, but its trapped air gradually dissolves into the water until the chamber fills and stops working. Sealed piston arrestors do not lose their charge this way, and models meeting the ASSE 1010 standard are the ones plumbing codes recognize.
Washing Machine Supplies: Both Lines, Right at the Hose Valves
The washing machine is the most common source of water hammer in a home, and the highest-value arrestor location. Its solenoid valves open and close several times per cycle, on both lines, and they close fast. If your pipes bang when the washer fills, start here.
Screw-On Arrestors at the Laundry Outlet Box
The simplest retrofit uses screw-on arrestors with 3/4-inch hose thread: one between each supply valve and its fill hose, hot and cold, with no cutting or soldering. The job typically takes under half an hour. Recheck the connections after the first few wash cycles, since a slow seep behind a machine is easy to miss.
Tee-Mounted Arrestors for a Permanent Washer Fix
Where the laundry supply is being replumbed, a tee-mounted arrestor on each supply line, as close to the outlet box as the framing allows, is the neater permanent option. Size AA is the standard residential callout for washing machine duty. Do not bury it behind finished drywall with no access panel, since even a maintenance-free device should stay reachable.
Dishwasher, Ice Maker, and Other Solenoid Valves Hiding Behind Cabinets
The dishwasher’s fill valve is another fast-closing solenoid, usually announcing itself with a single sharp knock as the fill cycle ends. The arrestor goes on the hot-water supply line near the valve, under the sink where the line tees off or behind the appliance, and size A is the typical residential callout. Ice makers deserve the same thinking on a smaller scale: a small arrestor at the shut-off valve where the refrigerator line connects protects the thin line and its fittings from repeated pulses. The same applies to any plumbed appliance with a fast-acting valve, such as a steam oven or plumbed coffee machine.
Toilets, Quick-Closing Faucets, and Shower Valves That Knock
Toilets are easy to overlook because their fill valves close more gently than a washing machine solenoid, but in a high-pressure home they can still knock, especially modern quick-close fill valves. If bathroom pipes thump when a toilet finishes refilling, a mini arrestor on the supply line at the angle stop is cheap insurance that threads on without opening the wall. Single-lever and sensor faucets can hammer too, since a lever snaps shut almost instantly and sensor faucets close on a solenoid; arrestors at the angle stops under the sink handle both. Quick-closing tub and shower valves follow the same rule, with AA arrestors on both supplies within six feet of each valve.
Branch Lines Longer Than Twenty Feet Need More Than One Arrestor
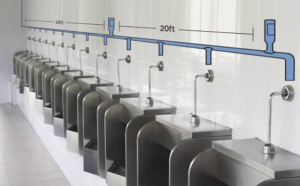
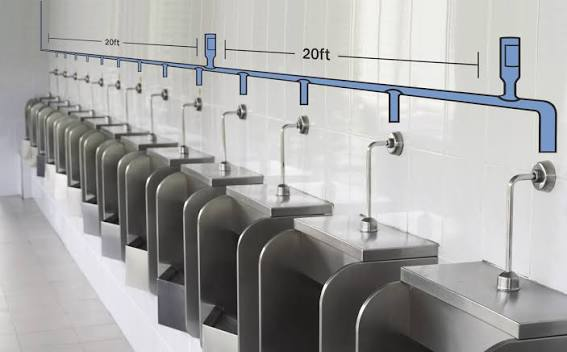
In new construction, one arrestor may be sized to serve a whole branch line feeding several fixtures. The rule for that case is different: the arrestor goes at the end of the branch, between the last two fixtures served, so it absorbs surges generated anywhere along the branch before they reach the main. The limit is length. For branches up to about 20 feet, measured from the start of the horizontal branch to the last fixture supply on it, a single correctly sized arrestor at the end is the established practice. Beyond 20 feet, an additional arrestor is needed, because one device cannot protect a long run from surges generated at its far end. This explains a common mystery: a home with one arrestor at the end of a long branch that still bangs at the far bathroom.
Sizing by Fixture Units: AA, A, and B Explained Without the Jargon
Arrestors are sized by a system from the Plumbing and Drainage Institute, known as PDI-WH201. It assigns each fixture a fixture-unit value, a measure of its probable water demand, and each arrestor a letter code for the total fixture-unit load it can absorb. The residential range runs from AA, the smallest, up to F for large commercial mains, but AA and A cover almost every home. A single-fixture arrestor is chosen for that fixture, and a branch arrestor for the sum of the fixture units on that branch. When in doubt, the manufacturer’s sizing chart for the specific product is the authority.
| Fixture or branch | Typical arrestor size | Where it sits |
| Washing machine (hot and cold) | AA on each line | At the outlet box or hose valves |
| Dishwasher (hot line) | A | Near the fill valve or under-sink tee |
| Ice maker / refrigerator line | AA mini | At the supply connection |
| Toilet fill valve | AA mini | At the angle stop |
| Branch serving several fixtures | Sized to total fixture units | Between the last two fixtures |
Matching the Arrestor to Copper, PEX, and CPVC Pipework
Pipe material does not change where the arrestor goes, but it does change which connection type to buy. Copper accepts soldered, threaded, compression, or push-to-connect arrestors. PEX needs PEX-compatible ends, either push-to-connect, crimp, clamp, or expansion fittings, or a threaded arrestor joined through a proper PEX adapter. CPVC takes threaded or solvent-compatible connections matched to the pipe size. Match the diameter to the supply line, commonly 1/2 inch for fixture supplies and 3/4 inch for washing machine hose connections.
A Step-by-Step Retrofit at a Washing Machine Outlet Box
The washing machine retrofit is the most common do-it-yourself arrestor job. The same steps apply at a dishwasher tee or toilet angle stop, with the connection type changed to suit.
Shut off and prepare: Shut off both supply valves and unplug the machine. Pull it out just enough to work, with a towel and small bucket under the connections.
Disconnect the hoses: Unscrew each fill hose from its valve. Expect a small amount of water from the hose, which is normal.
Fit the arrestors: Thread one screw-on arrestor onto each valve, hot and cold, using thread tape if the manufacturer calls for it. Hand-tighten, then snug with pliers without over-tightening.
Reconnect the hoses: Reconnect each fill hose to its arrestor, keeping hot to hot and cold to cold, and replace any flattened or cracked hose washers.
Test the fix: Open both valves slowly, run a short fill cycle, and watch every connection for drips. The bang should be gone or sharply reduced on the first cycle.
Arrestor Placement Blunders That Leave the Bang in Place
Most failed arrestor jobs fail on placement, not on the part itself. The mistakes below show up again and again in homes where an arrestor was installed and the noise survived.
- Protecting the main instead of the valve: One arrestor at the water main, far from every fixture, protects nothing. The surge has already done its damage by the time it reaches the main.
- Covering only one washer line: A washing machine with an arrestor on the cold line only will still bang on the hot line, because each valve closes on its own.
What a Washing Machine Arrestor Job Costs in Parts and Labour
Costs below are estimates for planning, not quotes, and they vary by region, brand, and connection type. A pair of screw-on washing machine arrestors typically runs 15 to 40 dollars each at retail, putting a DIY washer retrofit at roughly 30 to 80 dollars in parts plus thread tape and replacement hose washers. A plumber’s visit to fit arrestors at one or two fixtures, including diagnosis, commonly falls in the range of 150 to 400 dollars depending on access and local rates, with multi-fixture or branch-line work costing more where walls must be opened.
When the Bang Points to a Plumber, Not Another Arrestor
Most single-fixture retrofits are reasonable DIY work, but some situations belong to a licensed plumber. Call one if the banging persists after correctly placed arrestors, because that pattern points to high system pressure, a failed pressure-reducing valve, or a branch design problem that parts alone will not solve. The same applies if the noise comes with visible damage: damp patches, water stains on ceilings, or a water meter that moves when no fixture is running. Work that requires opening walls near electrical wiring, modifying the main supply, or disturbing galvanized or mixed old pipework is also plumber territory, as is any job where local code requires a permit or inspection.
Water Hammer Arrestor Placement Questions, Answered
How close to the valve does a water hammer arrestor really need to be?
As close as possible, and within about six feet. The surge starts at the valve, so every foot of pipe between the valve and the arrestor takes the full spike.
Does a washing machine need an arrestor on both the hot and the cold line?
Yes. The machine’s hot and cold solenoid valves close independently, so an arrestor on one line leaves the other line free to bang.
Can one arrestor protect a whole bathroom branch?
Yes, if it is sized for the total fixture units on that branch and placed at the end of the branch, between the last two fixtures served. Branches longer than about 20 feet need an additional arrestor.
Do PEX pipes still need water hammer arrestors?
Yes. PEX is quieter than copper, so the bang may sound softer, but the pressure wave is still generated and still stresses fittings and appliance valves.
Will an arrestor fix a rattling pipe or a humming tap?
Only if the noise is true water hammer, a single bang at the moment a valve closes. Continuous rattling usually means loose pipe supports, humming often means a worn valve, and thumps with no fixture running can mean high pressure or thermal expansion.
Final Thoughts: Silence the Valve, Not Just the Noise
Water hammer arrestor placement comes down to one habit: stand at the valve that slams shut and put the arrestor beside it. Washing machines get one on each line, dishwashers and ice makers get one at their supply, toilets and quick-closing faucets get a mini unit at the stop, and long branches get a second device when they pass twenty feet. Size the arrestor to the fixture or the branch, match the connection to the pipe, and keep the device accessible for inspection.
Start with the fixture you can actually hear. Fit the arrestor there, run the appliance, and listen. If the bang is gone, you have solved the most common version of this problem for the price of a small part. If it survives a correct installation, measure the pressure and call a plumber before the surge finds the weakest joint in the system for you.